Contents
Introduction and materials
Because we tend to be focusing more and more on videoing Buildeazy projects, we try to improve production as we go and occasionally we get – or make – a new tool to help.
“A track dolly would help”, somebody said. Mmmmmmmmm, I don’t know if we’d use one all that much, but sure would be fun to make. And after all, that’s what we do: make things.
A bit of research told us that there seems to pretty much be a standard method of building a D.I.Y. track dolly. It basically consists of a platform sitting atop a couple of pieces of angle aluminium (spelled aluminum in USA), with skateboard wheels attached beneath. The track dolly moves very smoothly along the tracks, which are a couple of PVC pipes.
Anyway, who are we to argue with the tried and tested? So we worked out the size that would best suit us and scouted around for the materials.
This is how you can make our version of the track dolly…
The measurements
The measurements throughout this project are given in both Standard (inches) and Metric (mm). The standard measurements are best suited to North America and the Metric measurements are best suited to Australasia and other countries. The inch sizes given in this project do not convert exactly to their corresponding metric (mm) equivalents, so use one or the other.
You will need
- One piece of 3/4″ (18mm) thick plywood 30″ (760mm) wide x 42″ (1060mm) long.
- Two pieces of 1/8″ (3mm) thick angle aluminum 1 1/2″ x 1 1/2″ (40mm x 40mm)
- Twelve skateboard wheels 1 1/16″ (30mm) wide x 2″ (50mm) diameter and bearings to suit.
- Four pieces of 1 1/4″ (32mm) inside diameter PVC waste pipe 10ft (3000mm) long.
- Four pieces of 1 1/4″ (32mm) outside diameter PVC conduit pipe 6″ (150mm) long.
- Twelve 5/16″ (8mm) hex bolts 2″ (50mm) long.
- Thirty-six 5/16″ (8mm) nuts and twenty-four washers.
- Sixteen screws 1 1/2″ (40mm) long.
- A dab of PVC pipe glue.
The wheels and the angle
Step 1: Measure, mark and drill the holes.
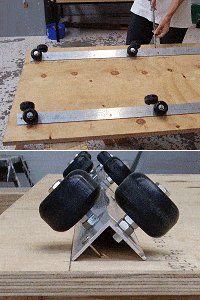
- Drill the holes in the aluminum angle for the wheel bolts and also for the screws to fasten the angle to the underside of the dolly platform. Read below for correct hole placements.
- Drill 5/16″ (8mm) holes for the wheel bolts along line (a) and 1/4″ (6mm) holes for the fastening screws along line (b).
- Line (a) is 5/8″ (16mm) down from edge (c).
- Line (b) is 5/8″ (16mm) up from edge (d). See the diagram above.
- Position the three bolt holes along line (a) in from each end 2″ (50mm) and 1 1/4″ (30mm) respectively, plus one in the middle.
- Position the four screw holes evenly along line (b) but not directly under any of the bolt holes. See the diagram above.
Note: When doing the other side of the aluminum angle, off-set all the wheel-bolt holes at least 3/4″ (20mm) along the line (a) to ensure that none of the opposing holes are in each other’s way. See diagram insert above.
Step 2: Assemble the wheels
- You can buy wheels with or without bearings. Ensure that the wheels have bearings already in them or buy them separately and put them in yourself – an easy task.
- To assemble the wheels and attach them to the aluminum angle, follow the steps below.
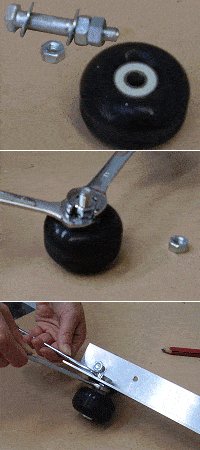
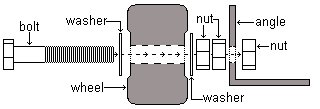
- Place a washer on a bolt.
- Add a wheel.
- Add a washer.
- Add a nut and only finger tighten against the washer.
- Add another nut and lock it against the first nut with a couple of spanners. See the picture middle-right. Ensure that the wheel can spin freely.
- Add the aluminum angle.
- Add another nut and tighten.
- Do the same to all twelve wheels.
The dolly platform
Step 3: Attach the angle to the platform
- For the dolly platform, use a piece of 3/4″ (18mm) thick plywood 30″ (760mm) wide x 42″ (1060mm) long.
Note: That particular size suited us. You can make a platform to whatever size suits you.
- Lay the platform upside-down on a couple of sawhorses.
- Draw a line along the length of the platform, 3 1/2″ (90mm) in from each side.
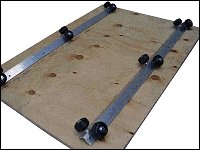
- Lay the two aluminum angles next to the lines.
- In other words, the two aluminum angles should be placed each side of the platform, 3 1/2″ (90mm) in from the edge.
- Screw through the screw holes into the platform.
Note: The screws should be long enough to go almost through to the other side of the platform for maximum hold.
- That’s the platform. Now for the tracks.
The tracks
Step 4: Make the tracks and try it
- Most PVC waste or water pipe is measured from the inside, whereas a lot of conduit pipes are measured from the outside. Therefore, it is possible to get a PVC waste pipe with a 1 1/4″ (32mm) inside diameter and a PVC conduit pipe with a 1/4″ (32mm) outside diameter.
- Theoretically, the conduit pipe should fit snugly into the waste pipe even though both pipes are called the same size.
- Anyway, it works because we found both size pipes.
- Cut four pieces of 1 1/4″ (32mm) outside diameter PVC conduit pipe 6″ (150mm) long.
- Cut four pieces of 1 1/4″ (32mm) inside diameter PVC waste pipe 10ft (3000mm) long.
- Put a bit of PVC pipe glue around the inside-end of one of the pieces of 1 1/4″ (32mm) inside diameter PVC waste pipe.
- Poke a piece of conduit pipe halfway into the end of the waste pipe so that 3″ (75mm) is inside and 3″ (75mm) is sticking out.
- Do the same to the other three lengths.
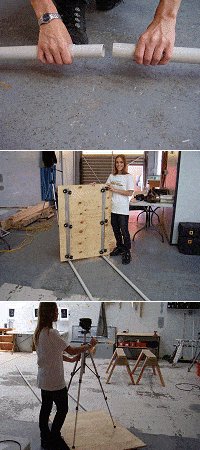
- You can now join the pipes together making a longer track. See picture.
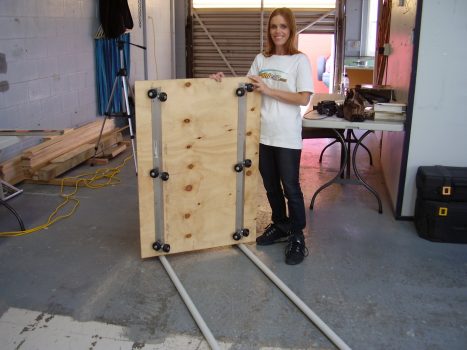
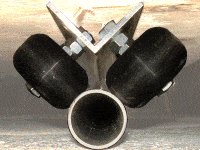
- Lay the pipes parallel on the ground approximately 20 1/2″ (525mm) apart. You do not have to be too fussy, as once the dolly starts running it will align the pipes automatically.
- Simply drop the dolly onto the tracks and watch it give the tripod and camera a smooth ride.
Enjoy!

