Contents
A handy platform cart for the garden
Introduction
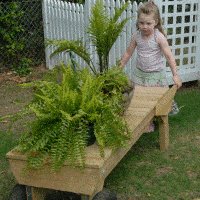
This wooden platform cart was originally made for another specific purpose: we needed some type of implement to stand on in order to trim the top of the hedge.
It had to be something that was stable and yet could be easily moved.
Hence, the platform cart.
Anyway, the wooden platform cart has since became the most useful and utilized implement in the garden and around the yard.
It is used as a standing platform, a plant pot mover, a portable bench seat and the grandkids use it to climb up onto the trampoline.
Not a day goes by without the cart being used for one thing or another.
The push cart is made out of 150mm x 20mm (3/4″ x 6″) boards for the platform and 90mm x 45mm (1 1/2″ x 3 1/2″) and 70mm x 45mm (1 1/2″ x 2 1/2″)
wood for the frame.
The wheels and axle were sourced from an old hand truck.
Plans – Parts – Cutting list
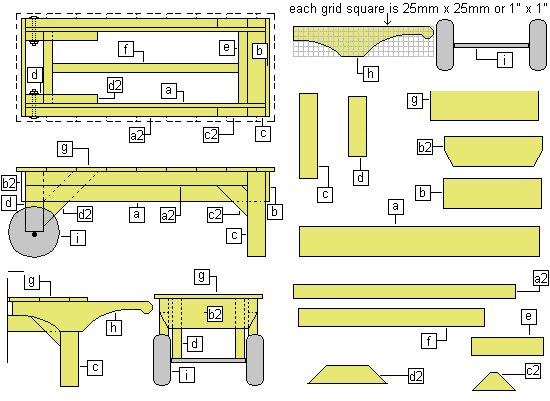
Platform cart plans and individual parts
Cutting list
| Part No. | Description | Size | No. req’d |
| a | Side board | 150mm x 20mm x 1200mm (3/4″ x 6″ x 48″) | 2 |
| a2 | Side strengthener | 70mm x 45 mm x 1110mm (1 1/2″ x 2 1/2″ x 44 1/2″) | 2 |
| b | Back end board | 150mm x 20mm x 490mm (3/4″ x 6″ x 18 7/8″) | 1 |
| c | Back leg | 90mm x 45 mm x 425mm (1 1/2″ x 3 1/2″ x 17″) | 2 |
| c2 | Back leg brace | 90mm x 45 mm x 225mm (1 1/2″ x 3 1/2″ x 9″) | 2 |
| d | Front leg | 90mm x 45 mm x 300mm (1 1/2″ x 3 1/2″ x 12″) | 2 |
| d2 | Front leg brace | 90mm x 45 mm x 400mm (1 1/2″ x 3 1/2″ x 16″) | 2 |
| e | Inner frame, short | 90mm x 45 mm x 360mm (1 1/2″ x 3 1/2″ x 14 3/8″) | 2 |
| f | Inner frame, long | 90mm x 45 mm x 925mm (1 1/2″ x 3 1/2″ x 37″) | 1 |
| g | Platform boards | 150mm x 20mm x 540mm (3/4″ x 6″ x 21 5/8″) | 9 |
| h | Handle | 150mm x 20mm x 700mm (3/4″ x 6″ x 28″) | 2 |
| i | Wheels and axle | 1 set |
- You will also need :
- 60mm (2″ or 2 1/2″) galvanized flathead nails
- 900m (3 1/2″) galvanized nails
- two 10mm x 120mm (3/8″ x 4 1/2″) galvanized carriage bolts and washers
Steps 1 to 3
Cut all the pieces
- First cut all the pieces to length as given in the ‘cutting list’.
- Some pieces need to be angle-cut and shaped. There is a drawing of every piece of wood on the previous page.
- The handle shape can be easily marked by using the grid plan (see the previous page).
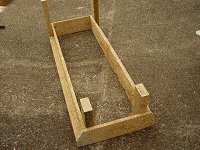
Step 1. Make up the sides
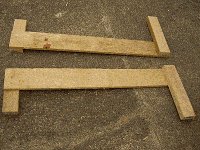
- Nail the front legs [d] and the back legs [c] to the side pieces [a].
- The two sides must be made up as a mirror image of each other.
- Us the picture as reference.
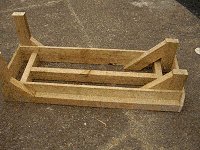
Step 2. Add the strengtheners
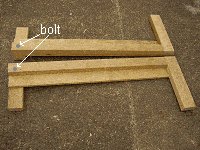
- Nail the strengtheners [a2] to the sides [a] and the front and back legs [c, d].
- Drill and bolt through the strengthener [a2], side [a] and the front leg [d] on each side.
- Use 10mm (3/8″) galvanized carriage bolts.
Step 3. Fix the two end pieces
- Nail the two end pieces [b, b2] to the sides [a], strengtheners [a2] and the front and back legs [c, d] making a rectangle.
This rectangle serves as the outside frame of the wooden push cart, albeit upside down. - If need be, refer to the plan and parts drawing on page two for part identification (part numbers and letters).
Steps 4 to 5
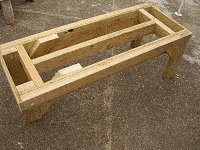
Step 4. Fix the inner frame
- Fix in place the inner frame members [e, f] and the leg braces [c2, d2].
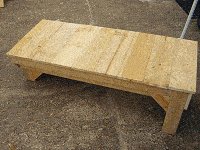
Step 5. Add the platform boards
- Turn the unit the right way up and add the platform boards [g].
- Use 60mm (2″ or 2 1/2″) galvanized flathead nails and nail the platform boards [g] to the side strengtheners [a2] and the inner frame members [e, f].
Steps 6 to 8
Step 6. Add the axle and wheels
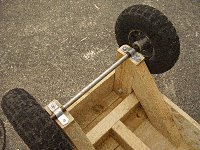
- Turn the unit upside down and add the wheel and axle set.
- Fix the axle to the front legs [d] with pipe saddle clips and galvanized metal strap (or with other suitable fixings).
- Note: This particular wheel and axle set was sourced from an old hand truck.
- If you source a wheel and axle set with a different wheel diameter and axle width, then you will need to make suitable adjustments to the
plan.
Step 7. Add the handles
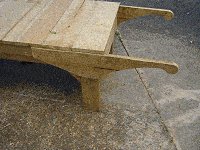
- Simply a matter of adding the handles and…
Finished!
Keep it away from the kids and you might even get a turn yourself!



Hi there I would like to download the plans for this garden dolly.
Thank you kindly
David