Contents
Introduction
Section 1:
Section 1.1. Introduction
This is a compact race car bed and is a good size for kids up to the age of 8 or so. It does not take up nearly as much room as a standard single bed, so it is ideal for a room where space is a premium.
I made this for one of my grand-kids and it proved an immediate hit. I don’t think I have ever seen a kid more proud of a bed.
Sometimes there’s a need for a parent to climb in next to their little one for a bit of a snuggle or two. This design allows for just that. Although this bed is compact, an adult can still lie next to their child as there are no feet barriers – hence, longer legs and the feet of a bigger person can hang past the front, unimpeded.
It is made out of 3/4″ (18mm) custom MDF board for the car frame, and 3/4″ x 3 1/2′ (90 mm x 19 mm) wood for the bed base.
Kids' racing car bed
$5.00Section 1.2. The size of it
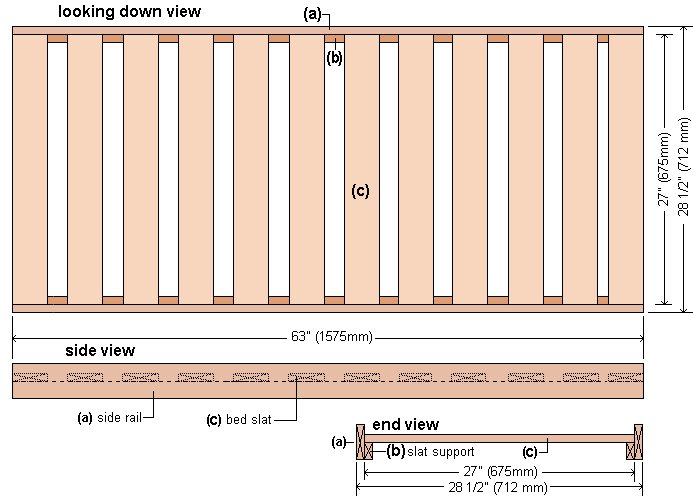
The bed base is 63″ (1575 mm) long and 28 1/2″ (712 mm) wide.
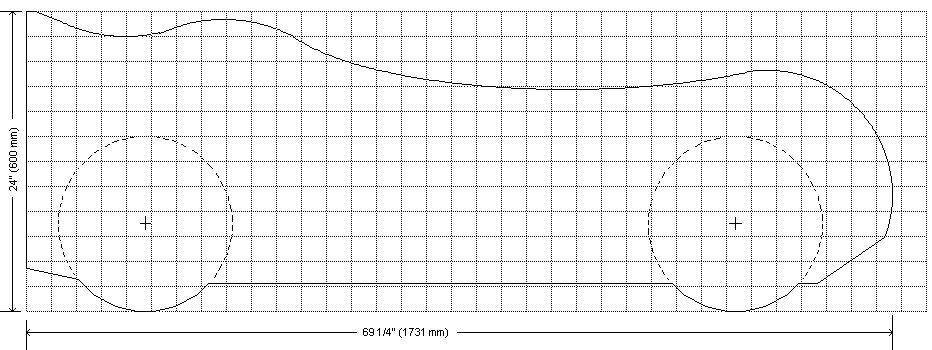
The overall size of the unit is 69¼” (1731mm) long, 31½” (787mm) wide, and 2ft (600mm) high.
Section 1.3. Wood size – Measurements given
About the measurements given:
The measurements throughout this project are given in both Standard (inches) and Metric (mm).
The standard measurements are given first followed by the metric measurements in brackets (). For example: 3/4″ x 3 1/2″ (90 mm x 19 mm).
For rounding-off and practical purposes, and in order to be able to apply the same grid plan to both the imperial and metric systems, the imperial (standard, inch) sizes in this project are not an exact match to the equivalent metric sizes. In this content 1″ equates to 25mm – not an exact match so use one system or the other but do not mix and match and you will be just fine.
The Plans
Section 2:
Section 2.1. Bed base plan
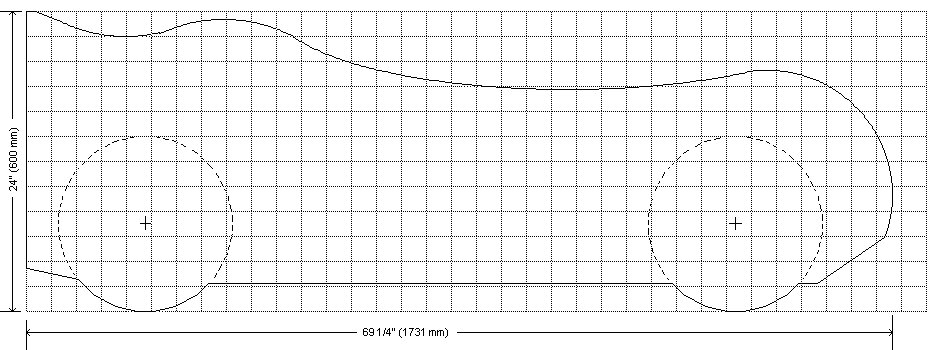
Car side-panel plan
Section 2.2. Car side-panel plan
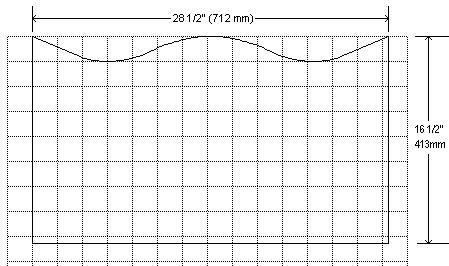
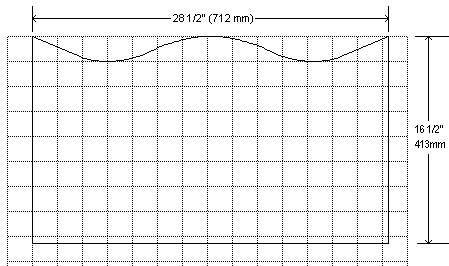
Section 2.3. Car back-panel plan
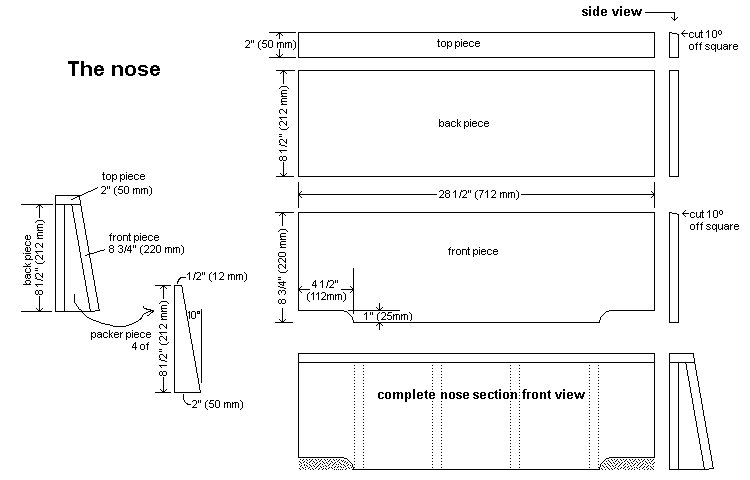
Section 2.4. Car front (nose) plan
Section 2.5. Longitudinal section view
The bed base
Section 3:
Section 3.1. Bed base wood requirements
| ITEM | FOR | STOCK SIZE | LENGTH | QTY |
| [a] | side rail | ¾” x 3½” (90 mm x 19 mm) | 63″ (1575 mm) | 2 |
| [b] | bed slat support | ¾” x 1½” (38 mm x 19 mm) | 63″ (1575 mm) | 2 |
| [c] | bed slat | ¾” x 3½” (90 mm x 19 mm) | 27″ (675 mm) | 12 |
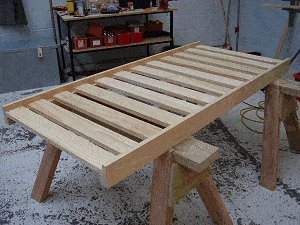
Section 3.2. Make the bed base
- Cut all the pieces according to the measurements given in the cutting list Above.
- Glue and screw the two slat supports (b) to the two side rails (a).
- Screw about every 8″ (200 mm) apart and pre-drill the screw holes through the slat supports (b).
- Place the side rails apart on a couple of sawhorses and spread the bed slats (c) along the top of the slat supports, allowing approximately 2″ (50 mm) gap between each slat.
- Glue and screw the slats to the slat supports. Use two screws at each end of every slat.
- Pre-drill the screw holes through the slats (c).
Making the body panels
Section 4:
Section 4.1. Mark the side panels
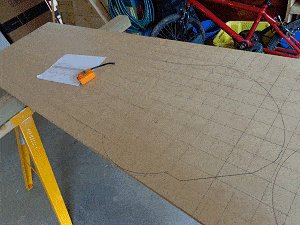
- On a piece of 3/4″ (18mm) custom MDF board, 8ft (2400 mm) long x 2ft (600 mm) wide, draw a grid with the grid lines spaced 2″ (50 mm).
- The grid plan shows the plan drawings scaled in a grid where the line spacings represent 2″ (50 mm).
- Copy (draw) the shape of the car (from the scaled grid plan below) onto the MDF board using the grid lines as reference points.
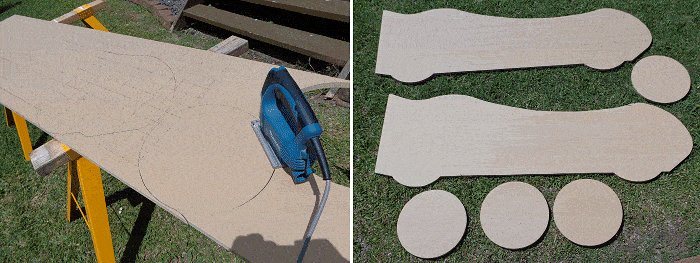
Note: For ease of marking and cutting, I ripped a standard 8ft (2400 mm) long MDF board in half, making two pieces 8ft (2400 mm) long by 2ft (600 mm) wide. I was able to get one side panel and two wheels out of each piece.
The shape of the car will take up less than 3/4 of the 8ft (2400 mm) long MDF board. On the free part of the board draw two circles (wheels), each with a diameter of 14″ (350 mm). Refer to the next section for ‘How to draw a circle’.
The diameter is the distance across a circle through its center point (the width).
The radius is the distance from the center point to one side which is half of the diameter.
In this case the radius is 7″ (175 mm).
Section 4.2. How to draw the circle
How to make a circle with a 7″ (175 mm) radius.
- Get a thin strip of wood (arm) about 8″ (200 mm) long, which is a bit longer than the radius. Hammer a small nail through the arm 7″ (175 mm) from one end. Hammer the nail into the MDF board, where you think the center of the circle (wheel) will be.
- Rotate the arm in a circle using the nail as the pivot point.
- Hold a pencil at the end of the rotating arm to mark the circumference (perimeter or outside edge of the circle).
Section 4.3. Cut out the side panels and wheels
- With a jig-saw cut out the marked side panel and the two wheels (as marked in the previous section).
- Use that car side as a template to mark the other car side onto another piece of MDF and also mark another two wheels.
- Cut that side panel and the wheels out.
Cut out the back panel
Section 4.4. Cut out the back panel
- Cut the back panel 29″ (725 mm) wide x 16 1/2″ (413 mm) high and shape the top using the grid plan for reference.
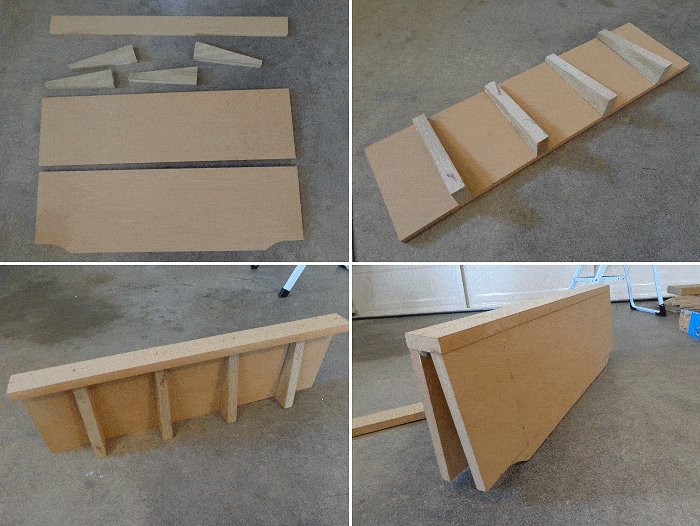
Section 4.5. Make the nose (front section)
- Make the nose. Refer to the plan drawing below and the following photos for a bit of visual guidance.
Assembling the pieces
Section 5:
Section 5.1. Fix the wheels to the side panels
- Fix the wheels to the side panels.
- Glue, drill, and screw through the side panels into the wheels.
- Align the wheels over the wheel shape in the side panels.
- Use five 1-1/4″ (32mm) wood screws for each wheel.
Section 5.2. Fix the nose section and back panel to the bed base
- Fix the back panel to the back end of the bed base.
- The bottom of the back panel will be 2″ (50 mm) below the bottom of the bed base.
- Drill and screw (on an angle) through the back panel into the ends of the bed base side-rails
- Fix the nose so it is positioned 2 1/4″ (56 mm) above the side rail of the bed base.
- Drill and screw (on an angle) through the nose into the ends of the bed base side-rails.
Section 5.3. Add the side panels
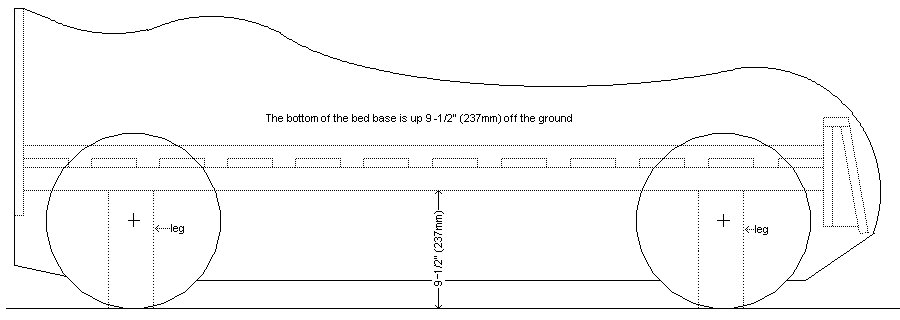
- Draw a line along the inside of the car sides up 9 1/2″ (237mm) from the very bottom (bottom of the wheels).
- That marks where the bottom of the side rail of the bed base will be positioned.
- Place one of the side panels on a flat surface with the wheels underneath.
- Apply some glue and place the bed base (on edge) so the bottom of the bed base side-rail aligns with the line which is up 9 1/2″ (237mm) from the very bottom (bottom of the wheels).
- Also ensure that the outside of the back panel is flush with the back end of the side panel.
- Drill and screw through the side-rail into the side panel.
- Nail through each end of the side panel into the edges of the back panel and the front grill.
- Flip the unit over and do the same on the other side.
Section 5.4. Add the legs
- Make four legs. They can be out of 3/4″ x 3-1/2″ (18 mm x 90 mm) stock or 1-1/2″ x 3-1/2″ (40 mm x 90 mm) stock or similar.
- Make them 9 3/4″ (243mm) long, which is a little longer than the distance from the bottom of the side-rails to the bottom of the wheels.
- The purpose is to take the weight and wear and tear away from the MDF wheels.
- Glue and screw the legs to the insides of the wheels.
A bit of paint and personality
Section 6:
Section 6.1. Make your mark
This is where you put your mark on it.
Let your imagination run wild. There are probably many things lying around the house you can use for a grille, headlights, eyes, or whatever.
With a few strokes of the brush and a few knick-knacks, you can make the car bed look happy, sad, coy, angry, or you can give it just about any personality you want. I think this particular car bed has a happy-sad-warm-caring sort of look about it.
Section 6.2. About the mattress
Use a 4″ (100 mm) thick foam rubber mattress.
Sometimes it is cheaper to buy a standard size single mattress and cut it to size.
There always seems to be special or sale somewhere for such items. It is not too hard to cut a standard size single foam rubber mattress. Just take off the cover, cut the foam rubber to size with a long bladed craft knife and re-sew the cover to suit.
The mattress area is 63″ (1575 mm) by 27″ (675 mm).
Wood you will need
Section 7:
Section 7.1. Wood for the bed base
| ITEM | FOR | STOCK SIZE | LENGTH | QTY |
| [a] | side rail | ¾” x 3½” (90 mm x 19 mm) | 63″ (1575 mm) | 2 |
| [b] | bed slat support | ¾” x 1½” (38 mm x 19 mm) | 63″ (1575 mm) | 2 |
| [c] | bed slat | ¾” x 3½” (90 mm x 19 mm) | 27″ (675 mm) | 12 |
In all you will need:
6 lengths of ¾” x 3½” (90 mm x 19 mm) @ 8ft (2400mm) long.
Note: The above amount allows for wastage, and includes item [b] which can be ripped out of ¾” x 3½” (90 mm x 19 mm) stock.
Section 7.2. Wood for the body panels
All the body (sides, front, and back) can be cut from 1 ¼ standard 8ft (2400mm) x 4ft (1200mm) sheets of 3/4″ (18mm) custom MDF board.
You will also need an assortment of screws, nails, glue, along with paint and any other knick-knacks you might want to add.

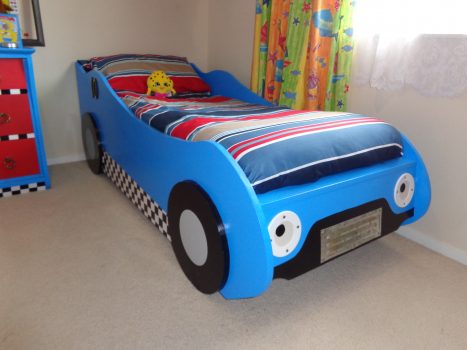




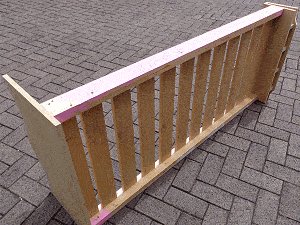

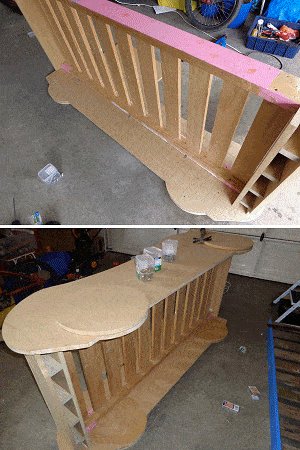
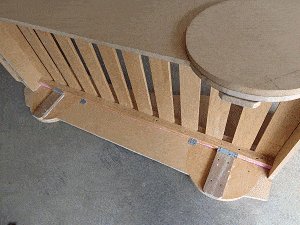
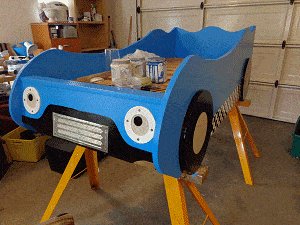
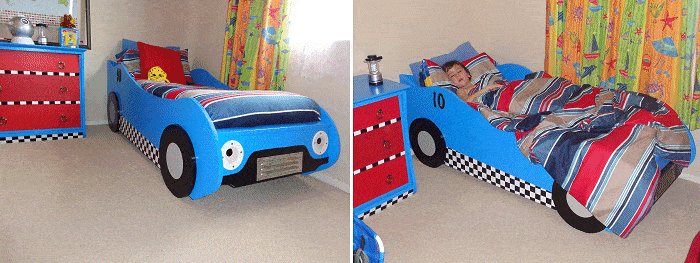
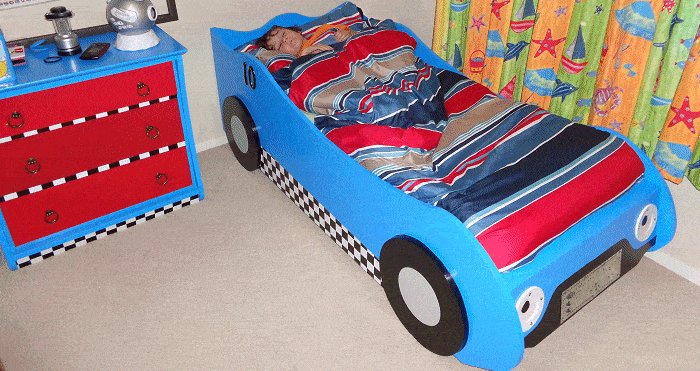


This racing car bed was made by Roger from a buildeazy plan.
The plans can be seen here https://www.buildeazy.com/kids-racing-car-bed/
Roger says
Hi
Attached photo of my bed to your design. Made slightly wider so I could use Ikea slats for base.
Many thanks – great fun.
Hope Grandson likes it!
Regards
Roger D Stonham
Eastleigh, UK