Contents
Garden chair project by Les Kenny
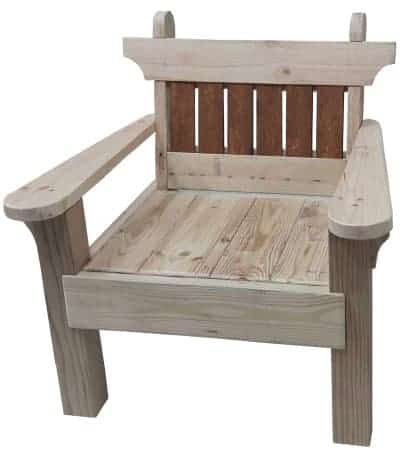
This is a very comfortable garden chair and it doesn’t look too bad either. It would pretty much look good in any garden.
Made out of mostly 140mm x 35mm (1-1/2″ x 5-1/2″) wood, it is a very solid, wide, and deep chair with decent size arm rests. You can laze back in it and do whatever you do when you sit in such a chair.
Note: About the measurements.
These instructions are given in both metric (mm) and standard (inch) measurements.
The metric measurements are given first followed by the standard in brackets ().
In some cases the metric measurements and the inch equivalent are not an exact match. This is for practical reasons.
Just use one or the other and you will be fine.
The metric measurements are suitable for Australasia, and the inch measurements are suitable for North America.
The rest of the world should be able to work out something between the two.
Chair and bench
$5.00Wood sizes and source
Different size woods are used in this project.
They are:
- Australasia (metric):
140mm x 35mm, and 190mm x 35mm, and 90mm x 90mm treated timber. - North America (standard)
1-1/2″x5-1/2″, 1-1/2″x7-1/2″, and 3-1/2″x3-1/2″ treated Lumber.
Actually, there is also a bit of 25mm x 25mm (1″x1″) strip needed as well.
At the time of writing some Lowes stores in North America stocked 1-1/2″ x 5-1/2″ and 1-1/2″ x 7-1/2″ Pressure Treated Lumber in 8ft, 12ft, and 16ft lengths.
Bunnings in Australia stocked 140mm x 35mm and 190mm x 35mm treated timber in various lengths up to 6 meters long.
90mm x 90mm (3-1/2″ x 3-1/2″) should be available in most places.
What the sizes mean
140mm x 35mm means wood that is 35 millimeters thick by 140 millimeters wide.
1-1/2″ x 5-1/2″ means wood that is 1-1/2 inches thick by 5-1/2 inches wide.
Materials you will need
Wood
- 8 meters (27ft) of 140mm x 35mm (1-1/2″ x 5-1/2″) stock, that allows for a little bit of wastage. Always cut the longest pieces first and cut the shorter pieces from the off-cuts
- 1800mm (6ft) of 190mm x 35mm (1-1/2″ x 7-1/2″) stock.
- 1200mm (4ft) of 90mm x 90mm (3-1/2″ x 3-1/2″) stock
- 2400mm (8ft) of 25mm x 25mm (1″ x 1″) stock
Other
- Infill of choice for the back of the chair. That can be strips or slats of wood, wrought iron, just about anything to fill an area 530mm (20-1/2″) by 210mm (8-1/4″). Imagination needed.
- About 40 wood screws 75mm (3″) long.
- Some glue and a smidgen of small nails for the infill (what ever you put in the back opening) and also for the cleats.
Cutting list
90mm x 90mm (3-1/2″ x 3-1/2″)
• 2 @ 564mm (22-1/4″) for the front legs.
190mm x 35mm (1-1/2″ x 7-1/2″)
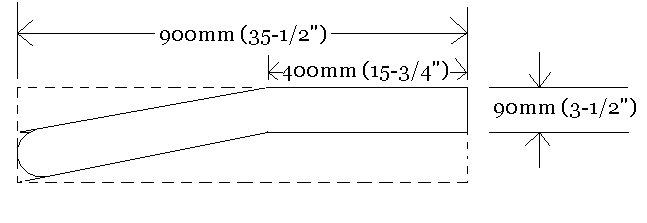
• 2 @ 900mm (35-1/2″) for the rear legs.
140mm x 35mm (1-1/2″ x 5-1/2″)
• 2 @ 742mm (29-1/4″) for the arms
• 1 @ 672mm (26-1/2″) for the front piece
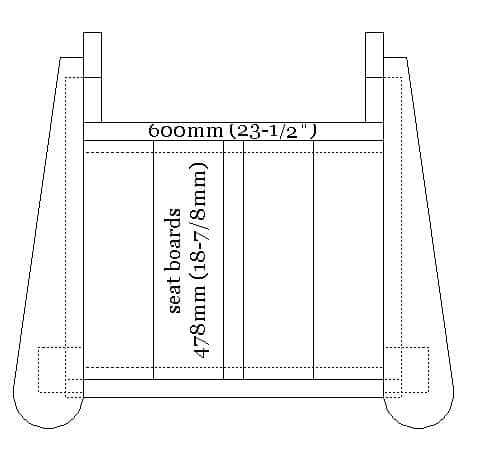
• 1 @ 600mm (23-1/2″) for the back piece
• 2 @ 606mm (23-7/8) for the side pieces
• 5 @ 478mm (18-7/8″) for the seat pieces
• 1 @ 530mm (20-1/2″) for the lower back rail
• 1 @ 800mm (31-1/2″) for the upper back rail
25mm x 25mm (1″ x 1″)
• 2 @ 600mm (23-1/2″) cleats for ‘under the seat’
• 2 @ 530mm (20-1/2″) cleats for the ‘infill’
In General
- Fix every join with glue and screws.
- Use two screws at each meeting.
- Pre drill the screw holes.
- Pre drill the screw holes through the face piece of wood only. That’s the piece that will
- display the screw head. Not the piece that is being screwed to.
- Use a drill bit the same diameter as the screw.
Plans
O.K. Let’s rip into it
First have a look at the plans and then we’ll get cracking.
Following are the instructions that were given to Jess to build this garden chair. I hope they will also benefit you should you decide to make one. Regardless of whether you are a novice or a seasoned D.I.Y.er these instructions, drawings, photos, and plans should guide you through the building process – remember, this was Jess’s first build.
Bit of a cautionary note: If you are a first timer attempting this project, ensure you have a qualified person to oversee the safety aspects of the job and show you how to use tools correctly. Do not use power tool unsupervised if you are a novice.
Cut all the pieces
- Cut all the pieces according to the cutting list. Cut the longest pieces first to minimize waste.
Making the back legs
- First make the back legs, which have to be shaped out of 190mm x 35mm (1-1/2″ x 7-1/2″) stock.
- So with two pieces @ 900mm (35-1/2″) long, mark the legs according to the drawing below.
- Cut the legs out, using a power saw and a handsaw (or more elaborate equipment if you have any)
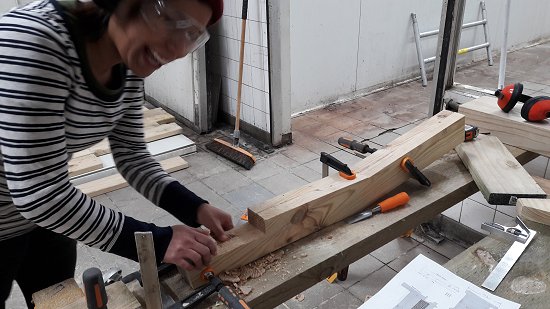
- Then they need to have a piece cut out to house the top back-rail
- Clamp the legs together and mark for the cut-out according to the drawing below
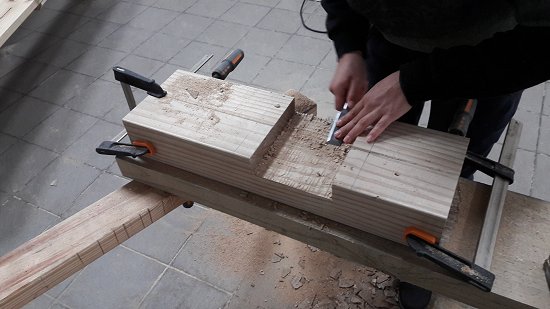
- Set the depth of the power saw to 35mm (1-1/2″) and make multiple cuts across the cut-out area and then clean it out with a hammer and chisel.
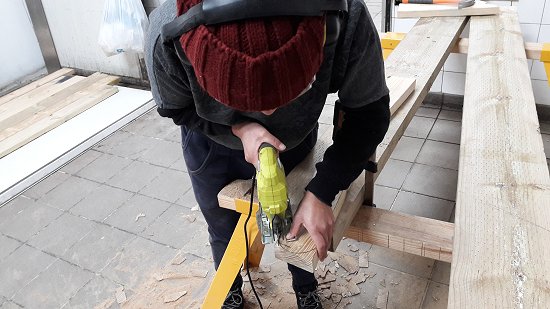
Round the top of the legs
- Round the top of the legs with a jig-saw
Make the front legs
- Out of 90mm x 90mm (3-1/2″ x 3-1/2″) stock cut two pieces that are 564mm (22-1/4″) long.
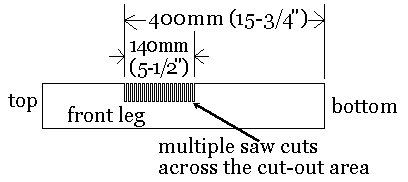
- Clamp the legs together and mark for the cut-out according to the drawing below
- Set the depth of the power saw to 35mm (1-1/2″) and make multiple cuts across the cut-out area and then clean it out with a hammer and chisel.
Add the side piece
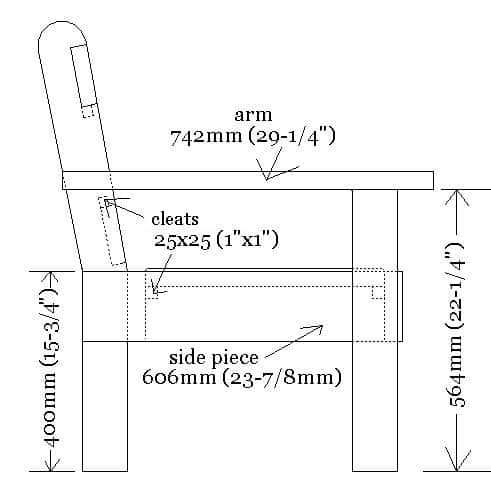
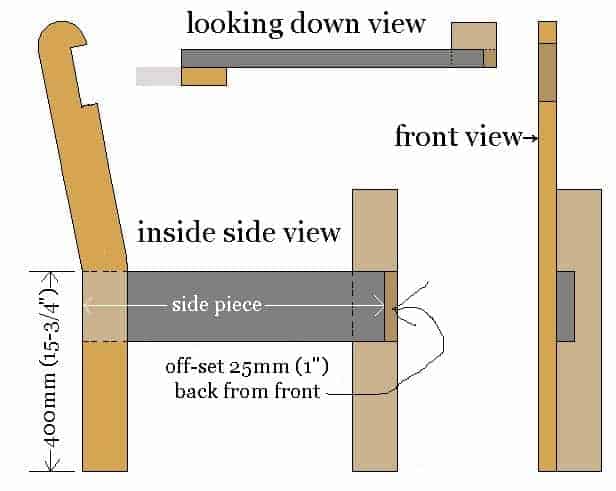
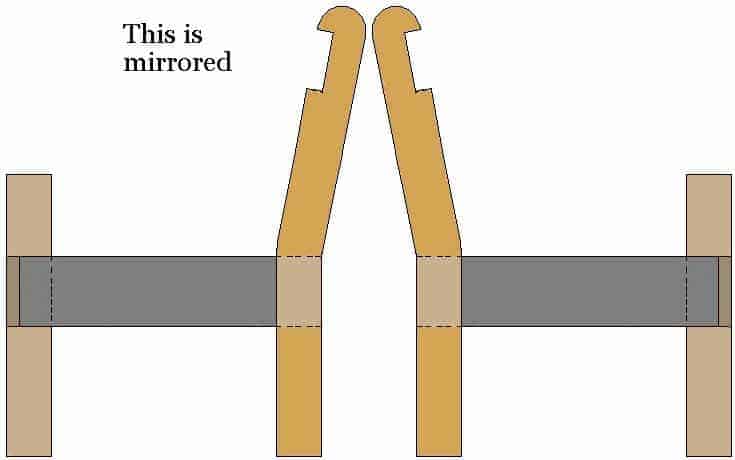
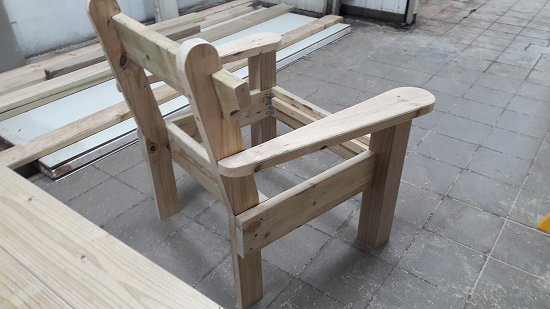
- Take special notice. The side piece is fixed to the outside of the front leg (in the cut-out) but is fixed to the inside of the back leg. The following drawing and picture should explain it all.
- Also, the side pieces are off-set in from the front 25mm (1″)
- Fix with glue and screws, two at each meeting.
- Do one side and then mirror the other side. Did you hear that? The sides must mirror one another.
Add the front and back pieces
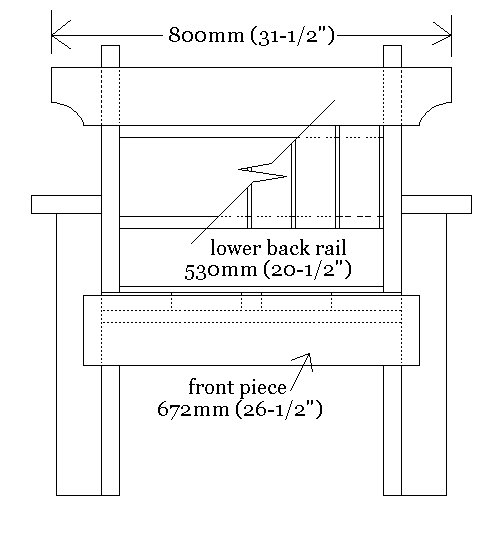
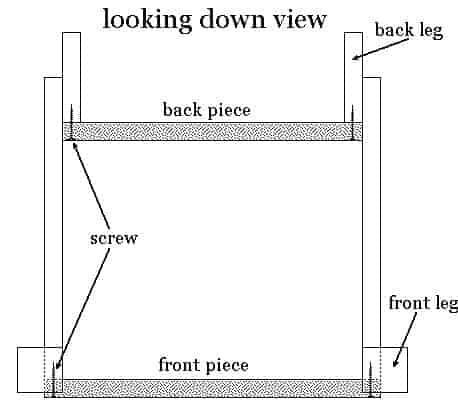
- Place the front and back pieces in position according to the drawing below.
- You will need a couple of clamps to hold them in place.
- Fix with glue and screws, two at each meeting.
Shape the arms and back rails
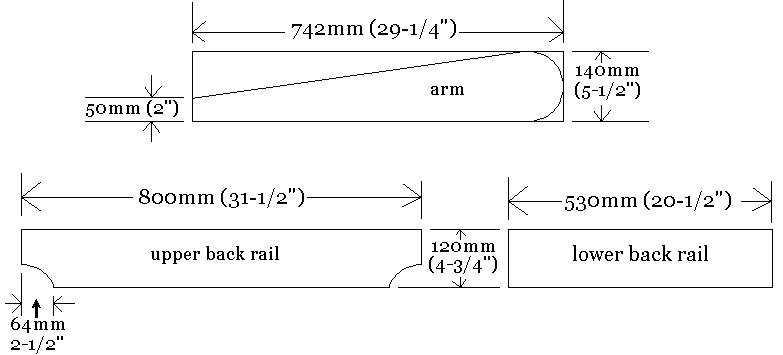
- Cut and shape the arms and back rails according to the drawing below.
- The back rails will need to be ripped (cut lengthwise) to achieve the required width.
- Ensure the pieces are clamped to a work bench or otherwise held secure while cutting.
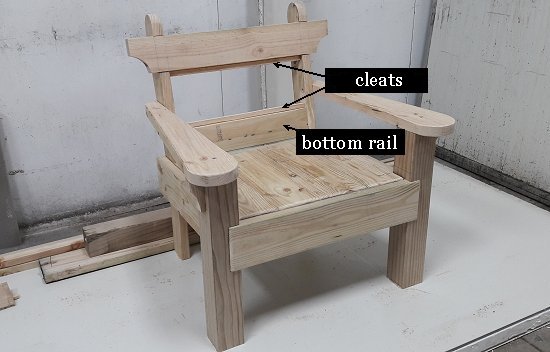
Add the arms, top back rail, and the ‘infill’ cleats
- Refer to the plan drawings and fit the arms, and top rail. Fix them with screws and glue.
- Nail the ‘infill’ cleats to the bottom edge of the upper rail, and the top edge of the bottom rail.
- Off-set them back from the front, 12mm (1/2″), or whatever the thickness of the infill is.
- The purpose of the ‘infill’ cleats are to support the infill.
We used 12mm (1/2″) slats for the infill, so therefore the ‘infill’ cleats were set back from the front
12mm (1/2″).
Add the ‘under-seat’ cleats and the seat boards
- Nail an ‘under-seat’ cleat to the inside of the front piece and another to the inside back piece. Position them 30mm (1-1/4″) down from the top. The seat boards will sit on the ‘under-seat’ cleats and they (the seat boards) will protrude
slightly above the top of the front board and the back board. - Apply glue to the top edge of the ‘under-seat’ cleats and sit the seat boards on them.
- Nails or screws will not be necessary, just put some weights on top of the seat boards to hold them down until the glue has set.
- One of the seat boards will need to be ripped (cur lengthwise) to make it fit.
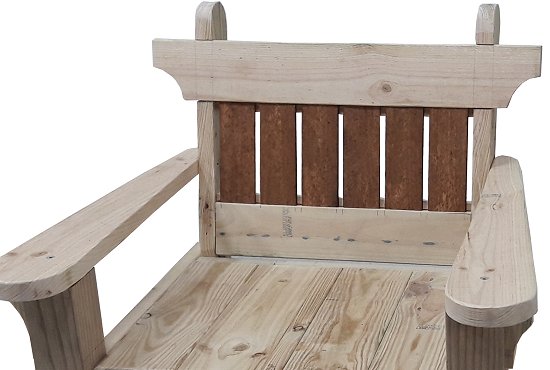
Just the infill to go
- Use whatever you want (a bit of imagination would be a fine thing) for the infill.
- We used 12mm (1/2″) thick slats and spaced them evenly along, with a little gap between each one.
- They were just glued in, as we didn’t want nail or screw heads showing in that part.






Great experience, thoroughly enjoyed it.
I have used a hand saw a few times but never power tools. My reluctance to use power tools was because I was intimidated by them-never used them in my life and always thought I wouldn’t be able to cut the wood properly.
The initial project that I was going to complete was an outdoor bench, but due to time constraints halfway through we had to change the project to a chair.
The project was pretty easy, however due to my lack of confidence in my ability to use power tools, I still found it challenging. I also had to get used to reading the building plans.
Les’ calming attitude helped a lot with calming my anxiety.
The first session I was dropped in the deep end and I learned how to use the circular power saw, we both thought I wasn’t able to use the mitre saw due to my small hand span. We later found out that I could… but more of that adventure soon.
The first step was to create the legs, using the circular power saw the progress was slower-me being a perfectionist also didn’t help.
At the start I found it difficult to cut a straight line using the circular power saw. If your initial cut into the wood is straight, then generally the rest of your cut is straight. If you push the saw through too fast it will vibrate a lot in your hand. You just need to guide the saw, with hardly any pressure. Slow and steady wins.
Halfway through the first session we realised I was able to use the mitre saw, however I was still scared to use it. The second session Les was having none of that and encouraged me to try it.
I thought why not, I came here to challenge myself.
I loved it! You don’t have to worry so much about cutting a straight line. You line up the cut before you start, make sure the piece of wood is flush against the back, release the safety and start by guiding the blade down and gliding the blade towards you if the wood is thick.
The mitre saw made it so much easier and faster! I have been converted.
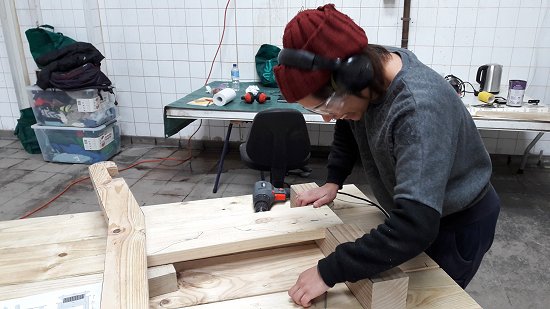
The best way to describe the drill driver is temperamental. I didn’t realise that with driving it is all about being in line with the screw not the drill driver itself being straight. If I wasn’t in line with the screw it would make a horrible noise. If I was in line with the screw it would work smoothly. Funny when I thought Les wasn’t watching is the time that I drilled perfectly.
I have to say my favorite tool was the jigsaw, and no not because I love completing jigsaw puzzles. I think this was the only tool I knew the name of. As soon as I made the first cut I knew this was my tool.
The blade in a jigsaw is more flexible than other saws, which can be a bit strange. I had to cut a rounded edge on the arm of the chair. It is not easy to manipulate the blade, again it is all about guiding the blade. It takes a lot of cuts to get what you want, you need patience with this tool. But the patience pays off with the finished product-a cut that you can be very proud of.
Unfortunately due to time constraints, I wasn’t able to complete as much as I wanted of the project. Les had to complete a lot of it. The parts I did complete I am very proud of. Completing these sessions has given me the confidence to say yes I can use power tools. I can’t wait for my next project. One that I will complete 100% of it!
Cheers
Jess
Video: https://www.youtube.com/watch?v=wNUlRHWShcE&feature=youtu.be
We failed making this type of chair in 2017. And I guess we’ll do another one on the next coming days! 🙂
Just finished my 1st attempt at this chair, apart from some minor quality control details it turned out pretty good. As a complete novice I’m pretty happy wit it. The plans & instructions were easy to follow & I’ll be trying a couple more of these then maybe that 2 seater bench seat.
I decided to leave the infill empty but may still put something in there in the future.
Thanks heaps for the free plans…. 🙂