Contents
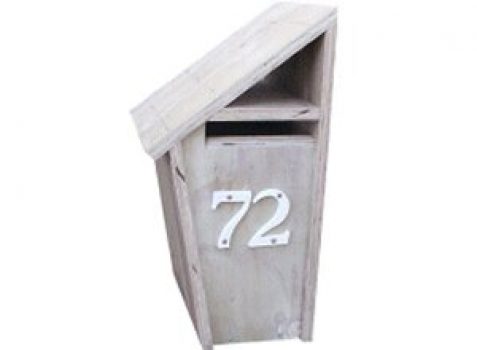
This type of wooden mailbox is along the lines of ‘letterboxes’ more likely to be found in the City Suburbs of Australasia.
US mailboxes are designed differently and for the most have postal regulations as to structure and dimensions including height off ground.
In the United Kingdom it still seems to be the ‘slot-in-the-door’ or the ‘slot-in-the-gate’ type letterbox that reigns although more recently the standard type rural US mailbox is getting increasingly popular in both Australasia and the United kingdom.
This particular wooden mailbox can be attached to the side of a post or any other structure. There is a separate place for letters, newspapers and parcels or bottles.
Construction material: 18mm (3/4″) thick plywood.
Dimensions: 507mm (20 1/4″) high, 270mm (10 3/4″) wide and 300mm (12″) deep.
This project is covered in two pages, firstly the mailbox plans followed by instructions on how to build the mailbox.
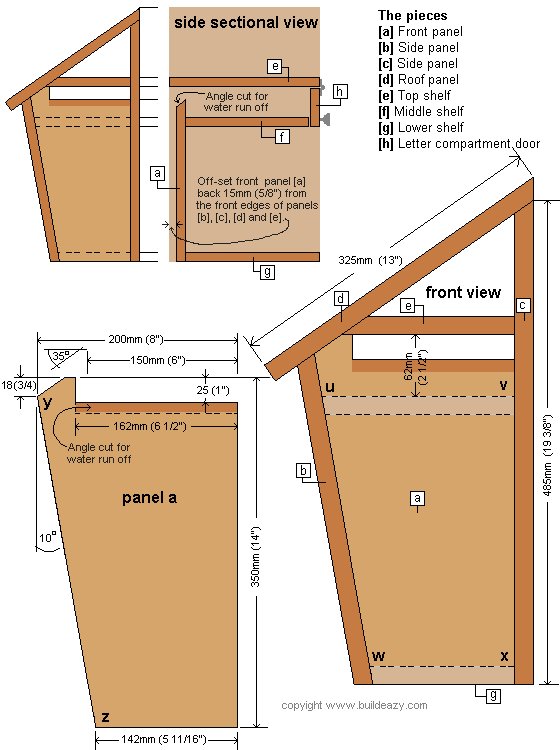
The mailbox plans
Building a mailbox – instructions
For the mailbox you will need…….
- A 1200mm x 600mm (2ft x 4ft) sheet of 18mm (3/4″) thick plywood.
- 40mm (1 1/2″) wood screws and/or 40mm (1 1/2″) galvanized nails
- Couple of small hinges and knob
- Exterior type wood glue
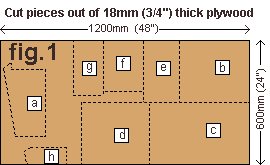
- All the pieces required to make the mailbox can be cut from a 1200mm x 600mm (2ft x 4ft) sheet of 18mm (3/4″) thick plywood which is a quarter of a standard 1200×2400 (4ft x 8ft) sheet.
- Some building supply stores sell handy quarter sheets or other sizes that also might do the trick. Ensure that the plywood is suitable for exterior use and that it has at least one smooth face. Fig.1shows how all the mailbox pieces can be cut from a 1200mm x 600mm (2ft x 4ft) sheet of plywood
Step 1. Cut the pieces
- Cut all the mailbox pieces to the dimensions as given below and refer to the plans as necessary.
- [a] Front panel: Cut to the dimensions as shown in the plans.
- [b] Side panel: Width – 300mm (12″). Length – The same as the distance between points y and z as shown on panel [a] in the plans. Angle the top end-cut back 25° and angle the bottom end-cut back 10°.
- [c] Side panel: Width – 300mm (12″). Length – 485mm (19 3/8″). Angle the top end-cut back 35°
- [d] Roof panel: Width – 300mm (12″). Length – 485mm (19 3/8″). Angle the top end-cut back 35°
- [e] Upper shelf: Length – 300mm (12″). Width – 173mm (6 15/16″). Angle one end-cut back 55° . This cut might have to be done with a handsaw as most power saws or bench saws will not cut angles more than 45°.
- [f] Middle shelf: Length – 248mm (9 7/8″). Width – The same as the distance between points u and v as shown on [a] in the plans. Angle one end-cut back 10°.
- [f] Lower shelf: Length – 267mm (10 5/8″). Width – The same as the distance between points w and x as shown on [a] in the plans. Angle one end-cut back 10°.
- [f] Letter compartment door: Cut to suit.
Step 2. Assemble the mailbox
- Commence assembly by first screwing and/or nailing the front panel [a] to the side panel [c].
- Make the panels flush (even) at the bottom and off-set panel [a] back 15mm (5/8″) from the front edge of side panel [c]. See the side sectional view in the plans.
- Use an exterior type wood glue and 40mm (1 1/2″) wood screws and/or 40mm (1 1/2″) galvanized nails to assemble the mailbox.
- If using screws, pre-drill the outer members making the hole size slightly bigger than the diameter of the shank (neck) of the screw.
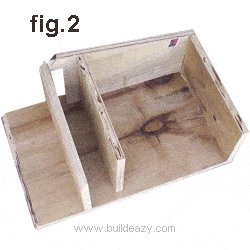
- Next add the three shelf pieces [e], [f] and [g] (see fig.2) followed by side panel [b] and then roof panel [d].
A note about the measurements
The dimensions given in this ‘how to build a mailbox’ project are in both metric (mm) and imperial (inches). A mailbox made using imperial measurements will be slightly bigger than a mailbox made using metric measurements. That is because in this project one inch is translated into 25mm for easy rounding. In reality one inch equals 25.4 millimeters.
The only people that will really notice the difference are those few that are capable of working in both metric and imperial with equal skill and mix measurements. In short, use either one or the other, metric or imperial but do not combine the two together.
Step 3. The letter compartment door
- Cut and shape the letter compartment door to suit so that it fits below the top shelf [e] and covers middle shelf [f].
- Hinge the door in place by fixing two smallish hinges to the top of the door and top shelf [e].
- Any other fixture is personal preference.
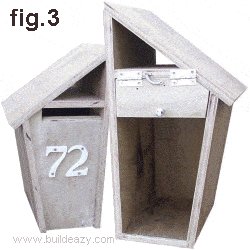
- If security is not an issue, then just a knob to open the door and some type of catch to keep the door closed or even a spring (as shown in fig.3) to close the door.
- If security is an issue, then some type of latch-set or pad bolt that can accommodate a pad lock will need to be added.
- Finally, just a bit of paint and the numbers.
All done!

